Filter and view all the related data on the merged cells
I have data in both Columns and Rows Merged , My problem was that I need to filter the data by column and when I do this the data showed is only for the 1st row of the merged cells.
The solution could be by simple Filtering tricks options and better than adding any codes
HYG How to do this
https://www.youtube.com/watch?reload=9&v=-Udd6Nc74dY
Another Two Techniques
Tehnique 1
https://www.youtube.com/watch?v=up3ZzvjXX44&pbjreload=10
Technique 2
https://www.youtube.com/watch?v=7L8Aq8lrR1k

Tuesday, May 29, 2018

Friday, May 25, 2018
How to Change Default Location for Outlook Data File (PST & OST)
Is there a way to change the default location
of new .pst file when create a new e-mail account in Outlook? Different
versions of Outlook use different default locations to store pst files. In this
tutorial we’ll show you how to change default location for Outlook .PST &
.OST data file using a registry trick. It works with all versions of Outlook,
including Outlook 2016 / 2013 / 2010 / 2007 / 2003.
How to Change Default Location
for Outlook PST/OST File?
1.
Press the Win + R keys in a meanwhile to open the Run box.
Type regedit and click OK.
2.
When the Registry Editor launches, navigate to one of the
following keys, depend on your Outlook version:
·
Outlook 2016:
HKEY_CURRENT_USER\Software\Microsoft\Office\16.0\Outlook
HKEY_CURRENT_USER\Software\Microsoft\Office\16.0\Outlook
·
Outlook 2013:
HKEY_CURRENT_USER\Software\Microsoft\Office\15.0\Outlook
HKEY_CURRENT_USER\Software\Microsoft\Office\15.0\Outlook
·
Outlook 2010:
HKEY_CURRENT_USER\Software\Microsoft\Office\14.0\Outlook
HKEY_CURRENT_USER\Software\Microsoft\Office\14.0\Outlook
·
Outlook 2007:
HKEY_CURRENT_USER\Software\Microsoft\Office\12.0\Outlook
HKEY_CURRENT_USER\Software\Microsoft\Office\12.0\Outlook
3.
At the right-side pane, right-click on any blank area and
select New -> Expandable String Value.

4.
Name the newly created value as ForcePSTPath, then double-click on it. On the Edit String dialog, enter the new default location where you wish to
store the PST file for Outlook new profile, and click OK.

Note: To change the default location folder of .ost files generated
by exchange accounts, you can create an expandable string value and name it
as ForceOSTPath.

5.
Close the Registry Editor and restart Microsoft Outlook
application. From now on, when you set up a new email account, Outlook will
automatically create a new PST file in the new default location.
This method won’t affect the location of
existing .pst files. If you want to change the location of existing pst file,
follow these steps:
1.
Exit the Outlook application. Locate your .pst file in Windows
Explorer and move it to a new location.
2.
Restart Outlook. An error dialog box appears that notifies you
that an Outlook Data File (.pst) could not be found. Click OK.

3.
It will open the Create/Open Outlook Data File dialog box. Browse to the new location, select the Outlook
Data File (.pst) that you moved, and then click Open.

4.
When you see a warning message, just ignore it by clicking OK. Now you’ve successfully moved your existing pst file to a new
location.
Tuesday, March 15, 2016
How To Get Whatsapp Notifications On Your Computer ?
How To get Whatsapp notifications on your Computer, chat , upload your pic via webcam and use your microphone to send voice message with a chrome extension:-WhatsApp has revolutionized our chatting experiences. A smart phone or a tablet is considered incomplete without WhatsApp in it. But not everybody has the time or the patience to take out the phone and type in a reply every single time a message received tone reverberates. You might be pretty busy doing your work on your laptop, or even busier say, watching a movie. You definitely would love it if you could view and respond to your WhatsApp messages right from your PC, wouldn’t you? Well, what doesn’t have a solution? I would say nothing. Read on, to learn how to get WhatsApp right on your Google Chrome browser with a very simple extension tool namedWhatsChrome.


STEP 1
- First of all, you need to get the WhatsChrome extension. You can get it from here. When the web page opens up, click on ADD TO CHROME button as shown in the screenshot.

STEP 2
- When asked for permissions, click on Add App button.
STEP 3
- Now you will be able to view a message that says WhatsChrome has been added to the new Chrome App Launcher. This means that the addition of the WhatsChrome extension has been successful.

STEP 4
- In the taskbar, look for the Chrome App Launcher icon. Click on it to find the WhatsChromeicon as shown in the screenshot. Now, to launch WhatsChrome, you just need to click on this icon.

STEP 5
- On launching WhatsChrome for the first time, you will be given a QR code. You need to scan this QR code with the WhatsApp application in your smart phone. To achieve the same, follow the steps given below.
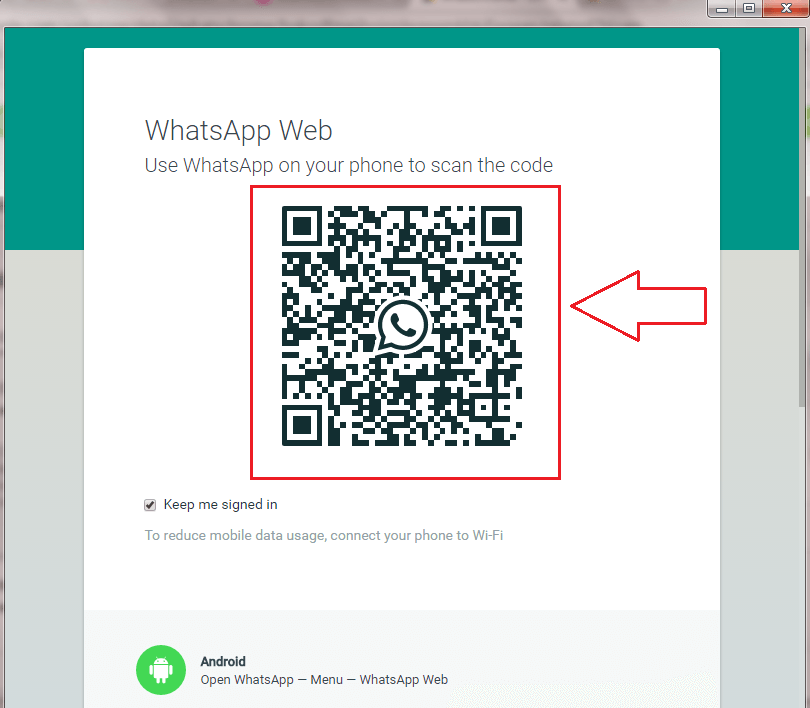
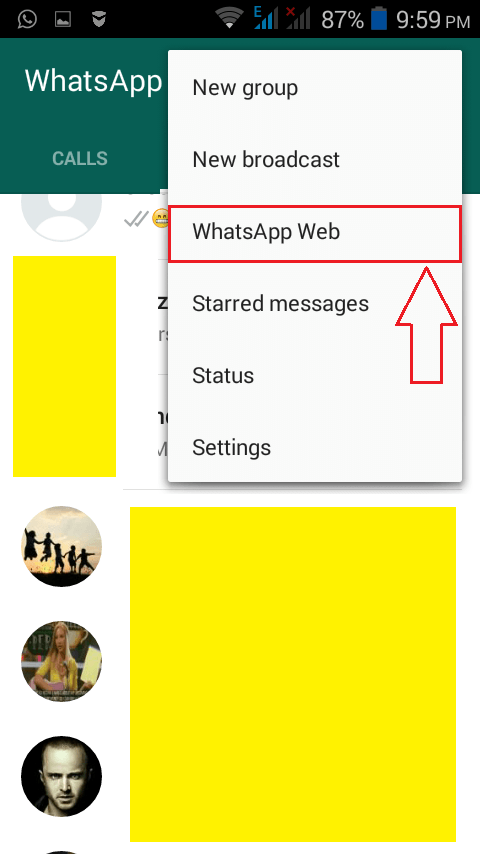
STEP 6
- Launch WhatsApp in your mobile phone and click on the More icon at the top. From the menu that gets expanded out, find and click on the option that says WhatsApp Web.
STEP 7
- When the Scan code screen comes into view, you can use it to read the QR code that was given to you by WhatsChrome extension.

STEP 8
- Once the QR code is successfully read by your mobile phone, Chrome will automatically display your WhatsApp messages for you.

STEP 9
- Make sure your phone has an active Internet connection. Otherwise, you will recieve the following error message.
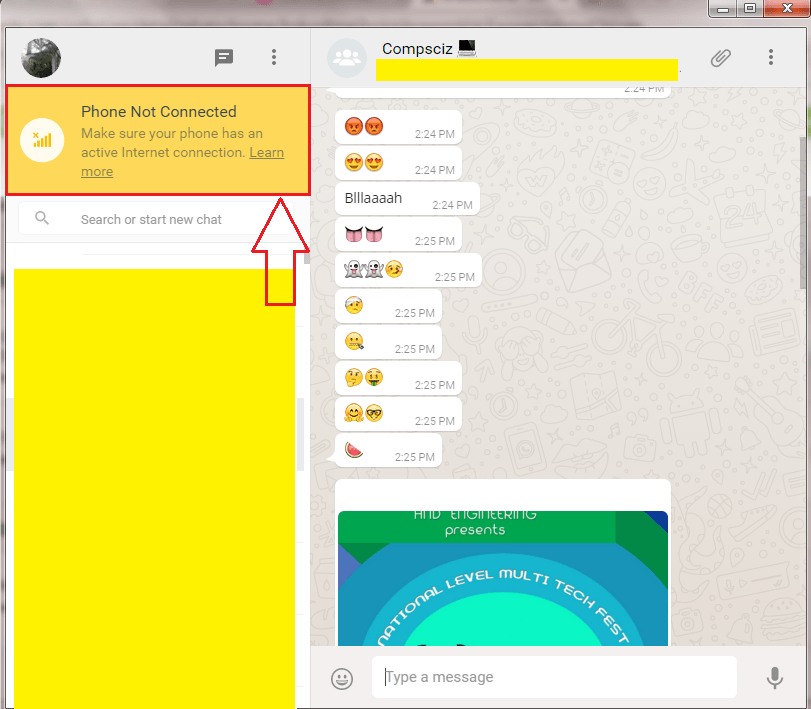
STEP 10
- Added bonus? Oh yes, you get notifications right on your desktop, whenever a message comes to you!

How to find Alternative to A Website Or Page ?
Find Alternative To A Website Or Page. Type Related:Site.Com

how to Find Pages Linking To A Particular Website ?
Find Pages Linking To A Particular Website, Search Link:TheWebsite.Com

How to Search For A Specific File Type In Google ?
Search For A Specific File Type In Google. Search Keyword Filetype:Yourfiletype
This is very handy when you want to do a pdf search. You can use it for other file types also.

How to Search City Forecast To Get A Weather Forecast For That City ?
Search City Forecast To Get A Weather Forecast For That City

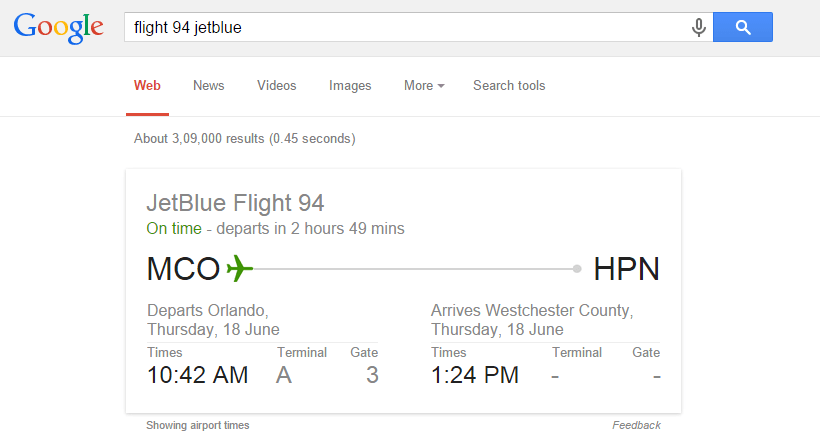
How to Search Flight Status on Google ?
Search Flight Status On Google. Search Flight No. And Company Directly In Search Box
How to get Get Search Results From A Particular Website Only
Get Search Results From A Particular Website Only, SearchSite:Website.Com Keyword

Subscribe to:
Posts (Atom)