Sunday, October 20, 2019

How to Reset Windows Defender Firewall ?

Windows Defender Firewall not remembering allowed apps or not allowing to delete uninstalled apps


Why won't these apps stick in the allowed apps, and how do I fix it?

Simply Press win + x keys select Powershell (admin) from the options , copy the below cmd and right click anywhere in the PS window the cmd will append to the prompt , press enter.

 (New-Object -ComObject HNetCfg.FwPolicy2).RestoreLocalFirewallDefaults()

Here are also four different methods to make this reset:

1. How to reset Windows Firewall to its default settings (all Windows versions)

First, you need to open the Windows Firewall. One way to do that is to open the Control Panel, go to System and Security, and click or tap Windows Defender Firewall.
Open Windows Defender Firewall in the Control Panel
In the Windows Defender Firewall window, click or tap the Restore Defaults link, on the left side of the window.
Restore defaults in Windows Defender Firewall
You are informed about what it means to restore the default settings for the Windows Firewall. To go ahead, click or tap Restore Defaults.
Restore defaults settings for Windows Defender Firewall
Windows tells you that it is going to delete all settings of Windows Defender Firewall that you have made since Windows was installed. Click or tap Yes to proceed.
Confirm that you want to delete all settings for Windows Defender Firewall
You are returned to the Windows Defender Firewall window, and all the firewall rules are now reset to their initial values, as they were when you first installed Windows.

2. How to reset the Windows Defender Firewall to its default settings, with Windows Security (Windows 10 only)

In Windows 10, you can restore the Windows Defender Firewall to its default settings, from the Windows Security app. In the search box on the taskbar, enter the "firewall & network protection" and click or tap the search result with the same name.
Search and open Firewall & network protection
This opens the Windows Security app, at its "Firewall & network protection" section with settings. On the bottom, you find the link for "Restore firewalls to default." Click or tap on it.
Link to Restore firewalls to default in Windows 10
A new window is opened with an explanation of what this does, and how it is going to remove all Windows Firewall settings. Click or tap the Restore defaults button.
Restore defaults for the Windows Defender Firewall
Windows 10 asks for your confirmation as the action cannot be reversed. Press Yes to complete the reset.
Confirm the Windows Defender Firewall reset
You are returned to the Windows Security app, and all the firewall rules are now reset to their initial values.

3. How to reset the Windows Firewall to its default settings from the Command Prompt (all Windows versions)

You can reset the Windows Defender Firewall to its default settings using the Command Prompt, also known as CMD. Open the Command Prompt as administrator, and run the following command: netsh advfirewall reset
Reset Windows Firewall from CMD (Command Prompt)
Press Enter on your keyboard, and the Windows Firewall is reset immediately. You only receive a text message saying OK. :) The same command can be run in PowerShell too.

4. How to reset the Windows Firewall to its defaults, using PowerShell (all Windows versions)

Open PowerShell as administrator, and run the following command: (New-Object -ComObject HNetCfg.FwPolicy2).RestoreLocalFirewallDefaults()
Restore default settings for Windows Defender Firewall by using PowerShell
Press Enter on your keyboard, and the Windows Defender Firewall is reset immediately, without any additional confirmation.


Middle click activates search. How do I turn it off??

Middle click brings up search. How to I turn it of??

I mostly use middle click for opening new tabs and closing tabs when browsing. Whenever I middle click, it activates search, even if i'm not in a browser.
I wanna turn this feature(if it is) off.. and if it's a bug how do I fix/get rid of it?? It's really annoying :-)

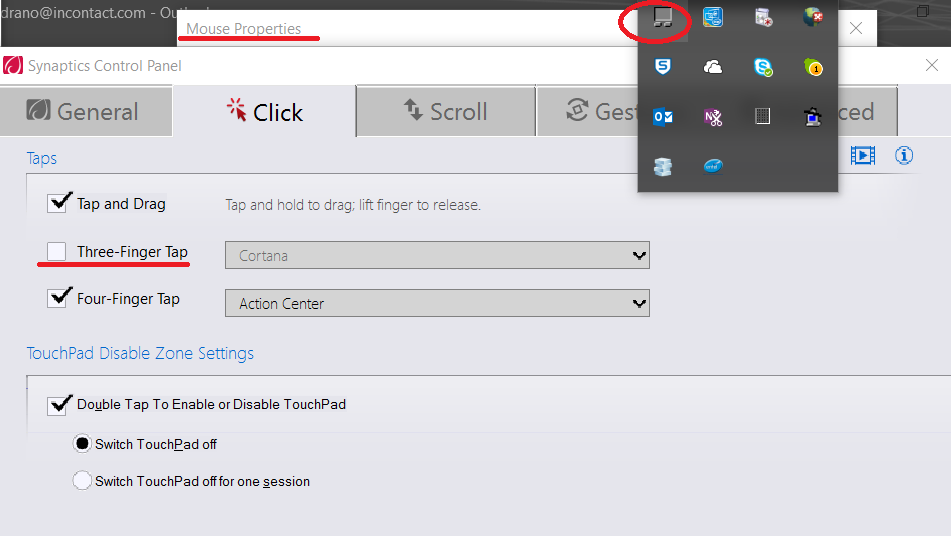
For me on my HP Laptop I disabled 3 finger tap to open cortana, and middle click is not bothering me any more. Weird fix is not it.
Touch pad icon → Mouse Properties → Settings →Three-Finget Tap
Image

How to fix Your system requires SMB2 or higher error on Windows 10 ?

Server Message Block or SMB is a protocol used for file sharing. It provides the Read and Write operations on network devices. This is widely used while a user is accessing a Linux-based Server. The latest version of this protocol is SMB2 which succeeds  SMB 1. SMB 2 contains more fixes to vulnerabilities that SMB 1 was prone to. SMB 1 was vulnerable being a gateway to various modern ransomware and hence has been disabled by default by Microsoft starting with Windows 10 v1709.
Your system requires SMB2 or higher error on Windows 10

Your system requires SMB2 or higher

We will cover every aspect of this process. So, let’s get started.

How to check if  SMB 2.0 version can be installed on your Windows 10

First of all, start by hitting the WINKEY + X button combinations.
Then click on Windows PowerShell (Admin).
Type in the following and hit Enter:
Get-SmbServerConfiguration | Select EnableSMB2Protocol
It will now show you a message. If it says true like in the snippet below, then your PC is capable of running SMB 2 protocol.
Else, you can not run SMB 2 Protocol on your PC.

How to enable SMB 2 Protocol on Windows 10

For this, you need to first enable SMB 1 protocol and then upgrade it to SMB 2.
Start by hitting the WINKEY + I button combinations to launch the Windows 10 Settings App.
Now, in the search area, type in Control Panel and select the appropriate resultThis will launch the Control Panel window on your computer.
Click on Programs. Then under the larger menu of Programs and Features, select Turn Windows features on or off.
Windows Features will now pop up.
Make sure that you select SMB 1.0/CIFS File Sharing Support. Now click on OK.
Let it install all the required files and Reboot your computer for the changes to take effect.
This will enable SMB 2 support on your computer.
Alternatively, you can also enter the following command in the Windows PowerShell window with Administrator Level right to enable it,
Set-SmbServerConfiguration –EnableSMB2Protocol $true
That’s it!

How to Creating a SSH tunnel using MobaXterm on Windows ?

This is an example of how to setup an SSH tunnel using MobaXterm.  Depending on what you're trying to remotely display, your port number(s) may be different. 

Start MobaXterm and click on the Tunneling icon.  Then click on the New SSH Tunnel button:


Configure local port forwarding as shown below and click Save:

Click on the blue arrow Start button to initiate the tunnel:

Complete the instructions to finish s here

When you're done, you can stop the tunnel by pressing the green square button.