Sunday, January 17, 2021

How to free up Space and Remove all Junk , temp and unnecessary Files on Windows 10

 In this article, I will show you how to remove junk files from windows 10. If your Windows speed is slow and has low storage space, it is better to remove all the junk files from Windows. As you know that, if we use the Windows system for a long time, the extra junk files will be saved in the background folder of Windows. Just follow this easy instruction to remove all junk files from windows 10.

How to Remove All Junk Files from Windows 10


In this article, I will show you how to remove junk files from windows 10. If your Windows speed is slow and has low storage space, it is better to remove all the junk files from Windows. As you know that, if we use the Windows system for a long time, the extra junk files will be saved in the background folder of Windows. Just follow this easy instruction to remove all junk files from windows 10.

1#. Delete Recycle Bin Files
The files in the recycle bin are all junk files, just delete them all to free up your storage space. 
If anytime you want to delete the unnecessary or junk files straight, you can Shift+Delete
junk files will not remain in the recycle bin.


2#. Storage Sense
Windows can automatically free up space by getting rid of files you don’t need, like temporary files 
and content in your recycle bin. Just make On storage sense to automatically remove junk files. 
And also, you can manage storage sense setting, from change how we free up space automatically. 
Here you can manage after how many days your Windows remove junk files and free up storage space.


3#. Free Up Space Now

In this part also you can remove temporary files like; Windows defender antivirus, 
Windows update cleanup, or thumbnails. Just choose which items you want to 
permanently remove to free up Disk Space.

Go to Setting> System> Storage> Free up space now

4#. Disk Cleanup

By disk cleanup option you can remove all junk files from hard disk, it can free up your space. 
It means, disk cleanup can delete temporary files, recycle bin, temporary internet files, thumbnails, 
and also you can Clean up system files. If you want to free up more space you can choose 
the compress the drive to save the disk space option.


5#. Remove Temp Files

You can remove the background junk files from Windows 10, in the background of Windows 10 
you can delete all the temp files, these files are junk and unnecessary file.
just press Windows + R> %temp%, select all and delete.

6#. Using Ccleaner Software

This software can help you easily remove junk files from Windows. This software covers the system 
junk files, the internet explorer history and pages, the Windows explorer useless files, the windows junk 
files, and more other actions. Just manage which part you want to delete, click on Run Cleaner. It will 
scan all the junk files from Windows and then you can easily remove them.

Conclusion:

It is better to remove the junk files each in every week, by this method all the junk files will be removed.
 Storage space will remain free and also Windows will work faster. Mostly junk files saved on Windows
 when we install more software and use more internet connection. These files will be saved in a 
temporary folder. Try to check each in every week the junk files and remove all the junk files from 
Windows 10.

Monday, November 2, 2020

How to uninstall the Your Phone app Windows 10?

 If you want to get rid of the app, or you're having problems, and the reset option doesn't work, you can uninstall it using PowerShell with these steps:

  1. Open Start.
  2. Search for Windows PowerShell, right-click the top result and select
  3.  Run as Administrator.
  4. Type the following command to uninstall the app and press Enter:

    Get-AppxPackage Microsoft.YourPhone -AllUsers | Remove-AppxPackage


Monday, October 26, 2020

How To Secretly Hide Folder/s or any Type of Files behind An Image


How To Secretly Hide Folder/s or any Type of Files behind An Image

How To Hide Your Secret Files Behind An Image: - Yes, you heard it right? You can hide all your secret files behind a harmless looking image file. No one would be able to guess where you have safely hidden all your secret data. This is an amazing trick that you should try today yourself. So let us Start to learn how to hack this amazing trick!


STEP 1

  •        First of all, create a folder or choose any folder in your hard disk drive .

STEP 2

·        Add all those files into this folder that you want to hide from others. You can add any sort of files including music files, documents, videos, your secret diary etc.


STEP 3

·        Now you need to compress all these files and make it a single file. For that I have used winrar. You can use any compression software of your choice. Another popular compression software is winzip or  7-Zip.


STEP 4

  • Now, open Command Prompt by typing cmd into your search box and launch it from the results that appear.

STEP 5

·        As next, copy-paste or type in the following commands one by one into your Command Prompt and hit Enter after each command.

Format

cd Folder Path\Name of the folder containing secret files

copy /b Name of the image file.jpg + Name of the zip file.zip Name of the image file.jpg

Example

cd D:\Important_Files

copy /b howto.jpg + Important_Files.zip newpicturename.jpg


That’s it. Now you can exit from the Command Prompt by either typing exit or simply by closing it. Refer to the screenshot given below in case you come across any difficulties.

Note : It is very important to take care of the special symbols like / and space while entering commands.

STEP 6

·        Now you can get back to the original folder. You can delete all the files including important_Files.zip AND KEEP ONLY THE NEWLY GENERATED PICTURE .


·        After this step, only the image file , i.e, newpicturename.jpg will remain in the Important_Files folder.


STEP 7

·        Now right click on the image file and then choose Open with. Choose a decompression software from the list. I have chosen winrar File Manager.


STEP 8

·        There you are! Now you can extract your secret files from your secret image file just like that.

After it is created, you can move the image file containing your secret files to any location as per your choice. You can save it anywhere, though, as no one would guess such a big secret could be lying under a sweet cute image. Feel free to leave comments in case you need assistance with any of the steps.


Sunday, October 25, 2020

How to Generate a QR code with your the access details to share your Wi-Fi access with your friends coming to your house

To share your Wi-Fi access with your friends coming to your house Simply go to  Generate a QR code  Put your access details. 

Print it and stick it on the wall.


How to Check a website is safe to visit or Not ?

Google’s Safe Browsing technology examines billions of URLs per day looking for unsafe websites. Every day, Google discover thousands of new unsafe sites, many of which are legitimate websites that have been compromised. When we detect unsafe sites, Google show warnings on Google Search and in web browsers. You can search to see whether a website is currently dangerous to visit.

Use the follwoing URL and change the red marked with your site you want to examine .

http://www.google.com/safebrowsing/diagnostic?site=spotlightshowto.blogspot.com


How to Search in Google for Direct Mp3 Links ?

 intitle:index.of?mp3 Your song name here


How to enable SSH session recording in CentOS 8 ?

CentOS 8 has been released and it includes some really amazing features. One feature that many security admins will greatly appreciate is session recording. With this feature, CentOS will record any/all SSH sessions, which includes all of the user activity that occurs during the session. Once recorded, videos of these sessions can be played back by any admin with a Cockpit login.

What you'll need

To make this work, you'll need the following:
  • A running instance of CentOS 8
  • A running instance of Cockpit 
  • A user with sudo privileges

How to install necessary packages

Before that first session can be recorded, there are a few packages that must be installed. Open a terminal window and issue the following commands:
sudo systemctl enable --now cockpit.socket"
sudo dnf install tlog
sudo dnf install sssd
sudo dnf install cockpit-session-recording
sudo dnf install systemd-journal-remote

Then setup a very basic SSSD configuration to manage local RHEL users.
To do this, I created an /etc/sssd/sssd.conf file with this basic example configuration:
[domain/local]
id_provider = files

[sssd]
domains = local
services = nss, pam, ssh, sudo
I then set the sssd.conf file permissions, and restart sssd:
chmod 600 /etc/sssd/sssd.conf
systemctl restart sssd
The next step is to open a web browser and to browse to the cockpit web interface, which is available on port 9090.  I used firefox, and browsed to https://<IP-Address>:9090, where <IP-Address> is the IP address of the RHEL 8 server.  
Login to cockpit either as the root user, or you can login with another user with sudo privileges, and check the box on the login screen to "Reuse my password for privileged tasks".  
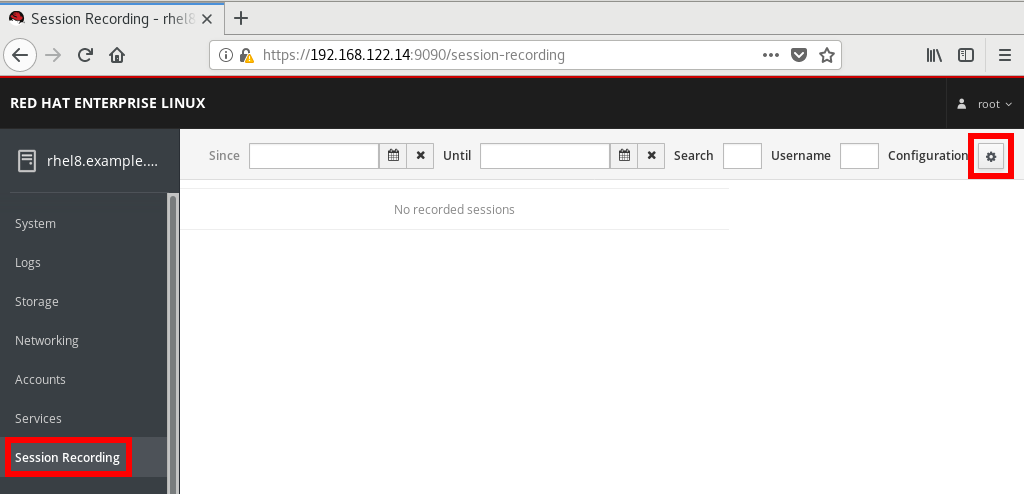
Once logged in, click on the "Session Recording" link on the left hand menu, then click the configuration gear button in the upper right corner.  
Web console in RHEL 8 Beta
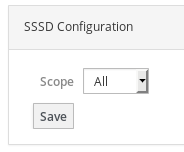
From here, several options can be configured such as a warning message to display to users to let them know their session is being recorded.   I’ll stick to the defaults, and scroll down to the SSSD Configuration section. From here, I’ll set the "Scope" to "All", and click the Save button.  This will configure session recording for all SSSD users.
SSSD Configuration

Testing Out Session Recording

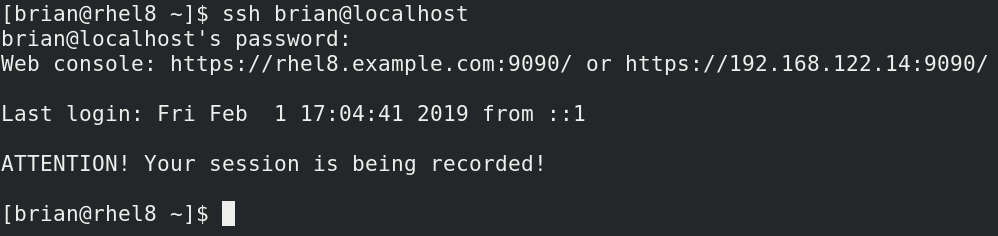
At this point, we have a basic session recording configuration setup, and we will confirm that it’s working. I’ll login to the server over SSH:
SSH Session
Notice the warning message that this session is being recorded (this message is configurable).  
Next, I’ll go ahead and run several commands which will be recorded, then exit out of the SSH session.  
Back from the web console interface, if I go back to the "Session Recording" menu option, I can see the sessions that have been recorded, including: the user name, the start and end times, and the duration of the recording:
Web console session chooser
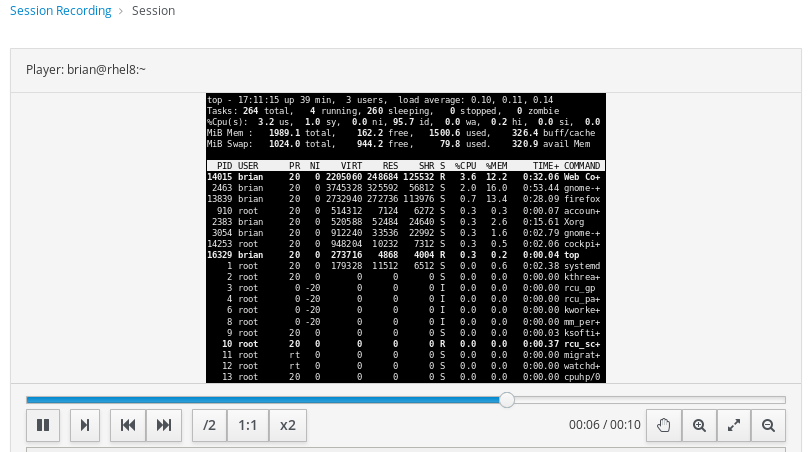
I’ll click on the this line, which will take me to the session recording player screen, where I can click the play button and watch what happened during the session. I can also change the playback speed to speed up or slow down the playback.  In my recorded session, I had run the top command:
Web console session playback

Accessing Recordings from the Command Line

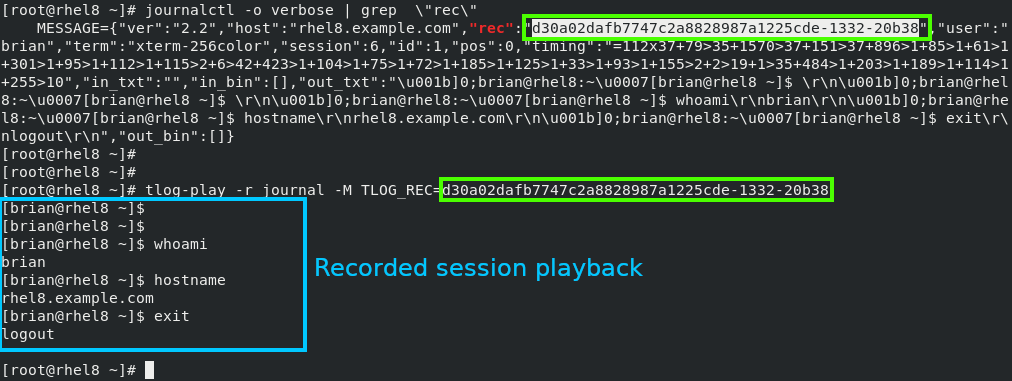
It is also possible to access the recordings from the command line rather than the Cockpit web based interface.   By default, the session recordings are stored in journalctl.
The first step to playing back a session from the command line is to find the recording ID, by running a command such as journalctl -o verbose | grep \"rec\".
Once the recording ID has been determined, the session can be played back with the tlog-play -r journal -M TLOG_REC= command, where recording_ID is the recording ID found with the previous journalctl command.
As an example, see the screenshot of session playback:
Terminal-based session playback

Monday, December 2, 2019

How SFTP Connection Error Received unexpected end-of-file from SFTP server ?

I have Spent couple of days searching for this and before i gave up  I was able to solve my issue by logging into SSH and editing the sshd_config file:
sudo nano /etc/ssh/sshd_config
Then scroll down until you see this line:
# Subsystem sftp /usr/lib/openssh/sftp-server
Leave that line commented out, but underneath it write this:
Subsystem sftp internal-sftp
Then either power cycle your server or  just do service sshd restart and the problem should be fixed. I’m now using the latest version of Filezilla without any issues.

As a note: You may need to change/add the ForceCommand in the user/group match block to use internal-sftp as well:
Match User someuser
    ..... other stuff .....
    ForceCommand internal-sftp
This fix Also Mobaexterm 

SFTP error code 103 so Both FileZilla and Mobaexterm is working Now :-)

Thursday, November 28, 2019

How To Install xrdp and enable remote desktop on CentOS 8 / Red Hat Enterprise Linux 8

xrdp is a free and open-source Remote desktop Protocol server which allows you to take remote desktop sessions of Linux server from Windows machine / Linux Machine. It is capable of accepting remote connections from rdesktop, freerdp, and remote desktop clients.
This post will help you to install xrdp on CentOS 8 / RHEL 8.

Prerequisites

Setup EPEL Repository

xrdp package is available on EPEL repository. So, we need to enable the EPEL repository on CentOS 8 / RHEL 8 to install xrdp.

CentOS 8

yum install -y epel-release

RHEL 8

yum install -y https://dl.fedoraproject.org/pub/epel/epel-release-latest-8.noarch.rpm

Install Gnome Desktop

Before installing the xrdp server, you would need to install the Gnome desktop using YUM command.

Install xrdp on CentOS 8 / RHEL 8

Install xrdp with TigerVNC package.

yum install -y tigervnc-server xrdp


Output:
Last metadata expiration check: 1 day, 5:23:26 ago on Wed 25 Sep 2019 06:04:22 AM EDT.
Dependencies resolved.
===============================================================================================================
 Package                       Arch                 Version                      Repository               Size
===============================================================================================================
Installing:
 tigervnc-server               x86_64               1.9.0-9.el8                  AppStream               252 k
 xrdp                          x86_64               1:0.9.11-1.el8               epel                    440 k
Installing dependencies:
 xorgxrdp                      x86_64               0.2.11-1.el8                 epel                     70 k
 xrdp-selinux                  x86_64               1:0.9.11-1.el8               epel                     20 k

Transaction Summary
===============================================================================================================
Install  4 Packages

Total download size: 782 k
Installed size: 3.0 M
Downloading Packages:
(1/4): xorgxrdp-0.2.11-1.el8.x86_64.rpm                                         59 kB/s |  70 kB     00:01
(2/4): xrdp-selinux-0.9.11-1.el8.x86_64.rpm                                    256 kB/s |  20 kB     00:00
(3/4): xrdp-0.9.11-1.el8.x86_64.rpm                                            329 kB/s | 440 kB     00:01
(4/4): tigervnc-server-1.9.0-9.el8.x86_64.rpm                                  179 kB/s | 252 kB     00:01
---------------------------------------------------------------------------------------------------------------
Total                                                                          126 kB/s | 782 kB     00:06
warning: /var/cache/dnf/epel-6519ee669354a484/packages/xorgxrdp-0.2.11-1.el8.x86_64.rpm: Header V3 RSA/SHA256 Signature, 
key ID 2f86d6a1: NOKEY
Extra Packages for Enterprise Linux 8 - x86_64                                  87 kB/s | 1.6 kB     00:00
Importing GPG key 0x2F86D6A1:
 Userid     : "Fedora EPEL (8) <epel@fedoraproject.org>"
 Fingerprint: 94E2 79EB 8D8F 25B2 1810 ADF1 21EA 45AB 2F86 D6A1
 From       : /etc/pki/rpm-gpg/RPM-GPG-KEY-EPEL-8
Key imported successfully
Running transaction check
Transaction check succeeded.
Running transaction test
Transaction test succeeded.
Running transaction
  Preparing        :                                                                                       1/1
  Installing       : xorgxrdp-0.2.11-1.el8.x86_64                                                          1/4
  Installing       : xrdp-selinux-1:0.9.11-1.el8.x86_64                                                    2/4
  Running scriptlet: xrdp-selinux-1:0.9.11-1.el8.x86_64                                                    2/4
  Installing       : xrdp-1:0.9.11-1.el8.x86_64                                                            3/4
  Running scriptlet: xrdp-1:0.9.11-1.el8.x86_64                                                            3/4
  Installing       : tigervnc-server-1.9.0-9.el8.x86_64                                                    4/4
  Running scriptlet: tigervnc-server-1.9.0-9.el8.x86_64                                                    4/4
  Running scriptlet: xrdp-1:0.9.11-1.el8.x86_64                                                            4/4
  Running scriptlet: tigervnc-server-1.9.0-9.el8.x86_64                                                    4/4
  Verifying        : tigervnc-server-1.9.0-9.el8.x86_64                                                    1/4
  Verifying        : xorgxrdp-0.2.11-1.el8.x86_64                                                          2/4
  Verifying        : xrdp-1:0.9.11-1.el8.x86_64                                                            3/4
  Verifying        : xrdp-selinux-1:0.9.11-1.el8.x86_64                                                    4/4

Installed:
  tigervnc-server-1.9.0-9.el8.x86_64       xrdp-1:0.9.11-1.el8.x86_64       xorgxrdp-0.2.11-1.el8.x86_64
  xrdp-selinux-1:0.9.11-1.el8.x86_64

Complete!
 
Once xrdp is installed, start the xrdp server service using the systemctl command.

systemctl start xrdp

 
xrdp should now be listening on 3389. You can confirm this by using the netstat command.

netstat -antup | grep xrdp

Output:
tcp        0      0 127.0.0.1:3350          0.0.0.0:*        LISTEN      8067/xrdp-sesman
tcp        0      0 0.0.0.0:3389            0.0.0.0:*        LISTEN      8068/xrdp

By default, xrdp server service won’t start automatically after a system reboot. Execute the below command to enable the service at system startup.

 systemctl enable xrdp

Firewall

Configure the firewall to allow RDP connections from external machines. The below command will add the exception for RDP port (3389).

firewall-cmd --permanent --add-port=3389/tcp 

 firewall-cmd --reload

Access CentOS 8 / RHEL 8 Machine via xrdp

Now, take an RDP session from any windows machine using Remote Desktop Connection program.


Tuesday, November 26, 2019

How DNS Over HTTPS (DoH) Will Boost Privacy Online

Companies like Microsoft, Google, and Mozilla are pushing forward with DNS over HTTPS (DoH). This technology will encrypt DNS lookups, improving online privacy and security.

What Is DNS Over HTTPS?

The web has been pushing towards encrypting everything by default. At this point, most of the websites you access are likely using HTTPS encryption. Modern web browsers like Chrome now mark any sites using standard HTTP as “not secure.” HTTP/3, the new version of the HTTP protocol, has encryption baked in.
This encryption ensures that no one can tamper with a web page while you’re viewing it or snoop on what you’re doing online. For example, if you connect to Wikipedia.org, the network operator—whether that’s a business’s public Wi-Fi hotspot or your ISP—can only see that you’re connected to wikipedia.org. They can’t see which article you’re reading, and they can’t modify a Wikipedia article in transit.
But, in the push towards encryption, DNS has been left behind. The domain name system makes it possible to connect to websites through their domain names rather than by using numerical IP addresses. You type a domain name like google.com, and your system will contact its configured DNS server to get the IP address associated with google.com. It will then connect to that IP address.
Until now, these DNS lookups haven’t been encrypted. When you connect to a website, your system fires off a request saying you’re looking for the IP address associated with that domain. Anyone in between—possibly your ISP, but perhaps also just a public Wi-Fi hotspot logging traffic—could log which domains you’re connecting to.
DNS over HTTPS closes this oversight. When DNS over HTTPS, your system will make a secure, encrypted connection to your DNS server and transfer the request and response over that connection. Anyone in between won’t be able to see which domain names you’re looking up or tamper with the response.
Today, most people use the DNS servers provided by their internet service provider. However, there are many third-party DNS servers like Cloudflare’s 1.1.1.1, Google Public DNS, and OpenDNS. These third-party providers are among the first to enable server-side support for DNS over HTTPS. To use DNS over HTTPS, you’ll need both a DNS server and a client (like a web browser or operating system) that supports it.

Who Will Support It?

Google and Mozilla are already testing DNS over HTTPS in Google Chrome and Mozilla Firefox. On November 17, 2019, Microsoft announced it would be adopting DNS over HTTPS in the Windows networking stack. This will ensure every application on Windows will get the benefits of DNS over HTTPS without being explicitly coded to support it.
Google says it will enable DoH by default for 1% of users starting in Chrome 79, expected for release on December 10, 2019. When that version is released, you’ll also be able to go to chrome://flags/#dns-over-https  to enable it.
Enabling secure DNS lookups via a Google Chrome flag.
Mozilla says it will enable DNS over HTTPS for everyone in 2019. In the current stable version of Firefox today, you can head to menu > Options > General, scroll down, and click “Settings” under Network Settings to find this option. Activate “Enable DNS over HTTPS.”
Enabling DNS over HTTPS in Mozilla Firefox's network settings.
Apple hasn’t yet commented on plans for DNS over HTTPS, but we expected the company to follow and implement support in iOS and macOS along with the rest of the industry.y
It’s not enabled by default for everyone yet, but DNS over HTTPS should make using the internet more private and secure once it’s finished.